I love burgers like I guess you figured by my post of the Sweet Potato Fries. Well here comes the recipe for my favorite grilled burger. It´s really simple but it takes a little time in making, just because the meat is better if you let it wait for a few hours to drink in the taste of the herbs and spices. In this recipe I used fresh herbs but if herbs are not in season you can always used dried herbs instead and get a similar result. However, make sure to use only quality beef, such as free ranged and/or organic, because non-quality beef can easily ruin the taste of the burgers and make them shrink as a lot when you put them on the hot grill.
The Burger Recipe
Serves 3
600gr good quality beef
10gr fresh thyme ( only the leaves)
5 gr fresh parsley
33 gr garlic without cloves
5gr mixed pepper
Start by cutting the thyme and parsley form the plants and then separate the leaves from the stalks. You won´t use the stalks in this recipe but if you are planning on having a pot roast within the next few days you can store the stalks from the thyme by placing them in a plastic container with a moist paper-towel, conceal the box and store it in the fridge.

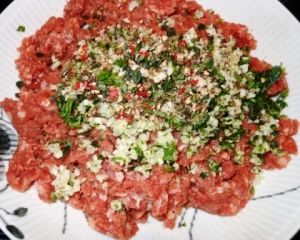
Next you should roughly chop down the thyme, parsley and the garlic and then crush the pepper.
Place your beef in a bowl so you can properly mix all your herbs and spices into the beef, using your hands to ensure it´s all mixed properly. Conceal it wit a plastic wrap and let it wait in the fridge for at least 2 hours. The longer it waits the richer the flavor of the herbs and spices.
While the beef waits in the fridge I usually use the time to cut down the potatoes and all the vegetables that I like on my burger. My favorites are, lettuce, mushrooms, carrots, red bell peppers, red onions, cucumber and tomatoes. The mushrooms, bell peppers and red onions I like to grill along with the burgers. However they are to thinly sliced to put directly on the grill so I punch wholes in a thick aluminum foil and place them on-top of that with a drizzle of olive oil before I put them on the grill. Then I grill them for just a few minutes until they get soft and have a little grilled look to them. The rest I place on a serving plate so it´s easy to put them on the burgers when they are ready.
For this recipe I used small new Icelandic potatoes but you can use any quality potatoes really. I sometimes also use the Sweet Potato Fries that I posted earlier this week. If you are using regular potatoes like I did, then rinse them well under cold water. Then cut them down into wedges and drizzle a little garlic olive oil on them and rub it in. Then punch wholes in aluminum foil and place them on top of that on the grill about 10 minutes before you put the burgers on. Then they should be ready at the same time. The time really depends on how big your wedges are though.
Also cut down about 4 slices of Gouda cheese and crumble up some blue cheese for your burgers.
Now when you have cut down your vegetables and potatoes, remove the beef form the fridge and split it into 3 even balls. Each burger should be a round 200gr, so I use a scale so they are all even, but you can eye it if you prefer. Then I just use my hands to make the burgers, pushing the beef balls down and molding them in my hands until I´m satisfied with the result.
Now the burgers are ready for the grill. I like mine medium cooked so I preheat the grill until it has reached about 600°C and then grill the burgers for about 5 minutes on each side. When you have flipped them put the cheese and the blue cheese on so it will melt completely while the burgers cook. The vegetables need similar cooking time so you can put them on at the same time as the burgers. Then if you like bacon like me you can grill it along with the burgers, vegetables, potatoes and the buns.
I still haven´t found good gluten-free hamburger buns so I cheat and use the regular once. I like to heat them up on the grill just before the rest of the food is ready so they get a little bit crunchy.
When everything is cooked and ready there is really nothing left other than assembling your burger and enjoying it. I like to cover my buns with bérnaise sause, then place a lot of lettuce on the bottom bun, then my burger, next the bacon and then the grilled vegetables and finally I top it off with more bérnaise and a little bit of ribsberrygél. This makes for a very tall burger so it can come handy to place a pin in the middle of it before you try cutting it up 🙂 
Enjoy with a cold beer or a glass of good red wine!


